Chapter 10 Presentation, Learning Resources
10.1 Part I: Presentation, Part II
10.1.1 The Tenth Assignment (in Moodle)
A. Write your feedback to each of your classmates’ presentation on the Forum in Moodle.
First, include the name of the presenter and/or the title of the presentation on the topic
Write on the following
- Comments on the presentation,
- Suggestions on the project, or
- Technical or general questions related to the presentation
You may add comments on your own presentation, and/or responses to comments.
B. Comments and/or questions about the data analysis (or data science)
- Your plan for the future. What do you want to learn as the next step?
- Technical or general questions related to the final paper
- Submit your response to Moodle (The Tenth Assignment) by 2021-03-02 23:59:00
10.2 Part II: Roundup, Learning Resources
10.2.1 Contents
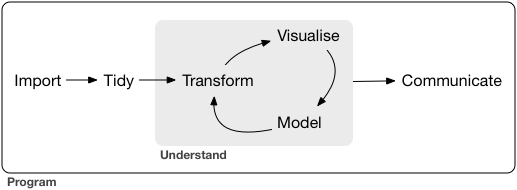
Review of Data Analysis for Researchers
Your Course Project
R Notebook, MS Word and PDF, Workflow
Chunk Options
Run Codes by R Studio
References for Your Course Project
Learning Resources
10.2.2 Focus of This Course – Exploratory Data Analysis
- Introduction to EDA – three weeks
- EDA for Beginners – three to four weeks
- Experiencing EDA – three to four weeks
10.2.3 Schedule and Grades
10.2.4 Your Course Project, Part I
All documents must contain ‘ID’, ‘Name’, ‘Date’ of submission
- ‘Short Paper’ (that can be much longer than the Paper
- Due: 2021-02-09 for Interim Report (and 2021-03-03: supporting doc for Paper)
- Contents:
- Objective: What and Why
- Data
- Reproducible Exploratory Data Analysis with Explanations
- Questions based on your findings and technical quesitons
- Format: R Notebook (*.nb.html)
- Presentation: 10 minutes (5-7 min. presentation and 3-5 min. QA)
- On 2021-02-17 [or 2021-02-24, a reserve]
- With a digital file (.nb.html, html, pdf, word, ppt, … ) by file share
- Note: Be ready to show your codes by R Notebook or R Scripts, when requested
10.2.5 Your Course Project, Part II
- Paper: 5 to 10 pages
- Due: 2021-03-03
- Contents: Exploratory Data Analysis Using Public Data
- Introduction - include what and why
- Description of Data
- Exposition of Your Exploration with Visualization of Data
- Concluding Remarks
- References, if any
- Acknowledgements, if any (can give a credit to your classmate)
- Note:
- Give logical explanations of your observations using data tables and charts
- No need to include the whole process
- Include codes only when necessary
- Format: pdf. (Rmd > pdf, Rmd > MS Word > pdf, Rmd > MS Word > Google Doc > pdf)
10.2.6 R Notebook, MS Word and PDF, Workflow
- Rmd > pdf: Use knit pdf, one of the knit options you can find under the knit button.
- Rmd > MS Word > pdf: Use knit Word, one of the knit options you can find under the knit button. Then, use one of the print options of MS Word to obtain a pdf file.
- Rmd > MS Word > Google Doc > pdf: If you do not have MS Word, upload your MS Word file obtained by knit Word into your Google Doc and edit it. You can create and download a PDF file easily using Google Doc. Since you can edit the file as an MS Word file now with Google Doc, you can make the style file mentioned above.
In the following, we focus on the second option and explain how to handle chunks and the MS Word style file.
title: "Title of Your Paper"
author: "Your Name"
date: '2021-03-03'
output:
  html_notebook:
    toc: yes
    number_sections: yes
    toc_float: yes
  html_document:
    toc: yes
    number_sections: yes
    toc_float: yes
  pdf_document: default
  word_document:
    number_sections: yes
#    reference_docx: "word-styles-reference-01.docx"
10.2.7 Export MS Word Using a Style File
- Use R Markdown to create a Word document
- Save as: ``word-styles-reference-01.docx’’
- Edit the Word styles you find there
- Edit the styles of file ``word-styles-reference-01.docx’’ .
- e.g. Change the page size: US Letter to A4 Paper
- Save this document as your style reference docx file
- Format an Rmd report using the styles reference docx file
References:
- Happy collaboration with Rmd to docx: https://rmarkdown.rstudio.com/articles_docx.html
- R Markdown: Definitive Guide - Word Document: https://bookdown.org/yihui/rmarkdown/word-document.html
- Custom Word templates: R Markdown Cookbook: https://bookdown.org/yihui/rmarkdown-cookbook/word-template.html
10.2.8 Edit Chunk Options
10.2.8.1 Before Exporting MS Word Document by knit Word
In the paper, you may want to deal with the following issues.
- You want to include the chart but not the code.
- You do not want to show your codes, results, messages, or warnings.
- You want to adjust the size of the figure to your document.
- You do not want to include a long table.
- … and many more.
10.2.9 Chunk Options
- include = FALSE prevents code and results from appearing in the finished file. R Markdown still runs the chunk code, and other chunks can use the resulting output.
- You should add this option after you check the code does not have an error.
- echo = FALSE prevents code, but not the results from appearing in the finished file. It is a useful way to embed figures.
- message = FALSE prevents messages generated by code from appearing in the finished file.
- warning = FALSE prevents warnings generated by code from appearing in the finished.
- You should add this option after you check the warnings. You may get errors or unexpected output.
- fig.cap = “…” adds a caption to graphical results.
- fig.height, fig.width: The width and height to use in R for plots created by the chunk (in inches).
Link to Chunk Option Quick Reference: https://rmarkdown.rstudio.com/lesson-3.html
See the R Markdown Reference Guide for a complete list of knit chunk options.
10.2.10 Examples and References
It is a good idea to explain the packages you used but does not need to show everything in your paper as the number of pages is restricted.
You can hide your setting by
include = FALSE.In HTML, you can include a big table, but in MS Word, you need to control the number of rows to appear. Here I used
slice(1:10), atidyversecommand corresponding tohead(10)in base R.You can include your chart without showing your code by
echo = FALSE.
Chunk Option Quick Reference: https://rmarkdown.rstudio.com/lesson-3.html
- R Markdown Reference Guide for a complete list of knit chunk options.
10.2.11 References for Your Short-Paper and Paper
- R Markdown
- R Markdown from R Studio
- R Markdown: The Definitive Guide
- R Markdown Cookbook
- bookdown: Authoring Books and Technical Documents with R Markdown
- Data Analysis Write-Ups
- R for Data Science, Part VI Communicate
- Data analysis write-ups: https://jgscott.github.io/teaching/writeups/write_ups/
- Structure of a Data Analysis Report: http://www.stat.cmu.edu/~brian/701/notes/paper-structure.pdf
10.2.12 R Studio: Run Codes
There are many ways to run your codes. You can use key bindings as well, I believe. However, before complete editing, your final product, make sure that your code chunks run correctly without error. You need to check this process because, with R Notebook, you can edit back and forth, but to be consistent, your product has to be read consistently from top to bottom. There are many options under the Run button, including Run All and Restart R, and Run All Chunks. I recommend you the following:
- Restart R and run all chunks.
- Knit your R Markdown file with the format of the final product.
- Check the output carefully.
Good luck! See Roundup.nb.html in Moodle
10.2.13 R Studio 1.4 - Released on 2021-01-19
10.2.13.1 Announcing RStudio 1.4 by Daniel Petzold and Carl Howe
- A visual markdown editor provides improved productivity for composing longer-form articles and analyses with R Markdown.
- The ability to add source columns to the IDE workspace for side-by-side text editing.
- To switch into the visual mode for a markdown document, use the button with the compass icon at the top-right of the editor toolbar
- A new command palette (accessible via Ctrl+Shift+P) provides easy keyboard access to all RStudio commands, add-ins, and options.
- Support for rainbow parentheses in the source editor (enabled via Options -> Code -> Display).
RStudio.cloud is in 1.4. For your computer you need to install RStudio 1.4.
10.2.14 Learning Resources, X – Interactive Practicum
10.2.14.1 Swirl Courses: Github
- R Programming: The basics of programming in R — done
- Regression Models: The basics of regression modeling in R
- Statistical Inference: The basics of statistical inference in R
- Exploratory Data Analysis: The basics of exploring data in R
10.2.14.2 RStudio Primers https://rstudio.cloud/learn/primers
- The Basics – r4ds: Explore, I
- Work with Data – r4ds: Wrangle, I
- Visualize Data – r4ds: Explore, II
- Tidy Your Data – r4ds: Wrangle, II
- Iterate – r4ds: Program
- Write Functions – r4ds: Program
- Report Reproducibly and more … Coming Soon
10.2.15 Learning Resources, X – Books
- R for Data Science by Hadley Wickham and Garrett Grolemund
- – you are ready to learn
- ggplot2: Elegant Graphics for Data Analysis by Hadley Wickham
- the on-line version of work-in-progress 3rd edition
- Bookdown: https://bookdown.org
- Books on Statistics
- difficult to choose…
10.2.16 Learning Resources, X – Moocs and Online Courses
- edX
- HarvardX Data Science - 9 courses. Textbook
- coursera
- JHU Data Science - 10 courses
- JHU Data Science: Foundations using R Specialization, 5 courses
- Interactive Learning Sites:
- DataCamp: https://www.datacamp.com
- Dataquest: https://www.dataquest.io
10.3 Learning Resources
10.3.1 Learning Resources, X – Interactive Practicum
10.3.1.1 Swirl Courses: Github
- R Programming: The basics of programming in R — done
- Regression Models: The basics of regression modeling in R
- Statistical Inference: The basics of statistical inference in R
- Exploratory Data Analysis: The basics of exploring data in R
10.3.1.2 RStudio Primers https://rstudio.cloud/learn/primers
- The Basics – r4ds: Explore, I
- Work with Data – r4ds: Wrangle, I
- Visualize Data – r4ds: Explore, II
- Tidy Your Data – r4ds: Wrangle, II
- Iterate – r4ds: Program
- Write Functions – r4ds: Program
- Report Reproducibly and more … Coming Soon
10.3.2 Learning Resources, X – Books
- R for Data Science by Hadley Wickham and Garrett Grolemund
- – you are ready to learn
- ggplot2: Elegant Graphics for Data Analysis by Hadley Wickham
- the on-line version of work-in-progress 3rd edition
- Bookdown: https://bookdown.org
- Books on Statistics
- difficult to choose…
10.3.3 Learning Resources, X – Moocs and Online Courses
- edX
- HarvardX Data Science - 9 courses. Textbook
- coursera
- JHU Data Science - 10 courses
- JHU Data Science: Foundations using R Specialization, 5 courses
- Interactive Learning Sites:
- DataCamp: https://www.datacamp.com
- Dataquest: https://www.dataquest.io